7.3.3. Modifying SIGFLOW engine rules
7.3.3.1. Introduction
Rules are found in categories
Categories are found in sources
Sources are placed in rulesets
The implementation of a transform rule
The disabling of a transform rule
The enabling of a transform rule
The implementation of a Threshold rule
The implementation of a The Suppress rule
Note
7.3.3.1.1. Transform rule
7.3.3.1.1.1. Concept
Modify the content of a rule, for example, modify the action of a rule by replacing the Alert action defined in the rule with another action of type drop or reject. This change is defined in the transformation rule
Add a keyword to the rule (bypass or filestore) defined in the transformation rule
Change the content of the rule by inheritance. By configuring the rule with the default setting (category default) of the container (the category), the rule inherits the contents of this parameter
- This can be done at the category level. In this case, the changes are applicable for all rules contained in this category.Change handling is the same as at the rule level except the default setting is ruleset default set at the ruleset level.
- This can be done at the ruleset level. In this case, the changes are applicable for all rules contained in all categories of the ruleset.Change management is the same as category level except that there is no default setting.
7.3.3.1.1.2. Parameters
The various possible parameters are:
- The
`Action`field determines the measure to be applied to the rule.For example, modifying the action of a rule by replacing the Alert action defined in the rule with another action of type drop or reject or add a keyword to the rule (bypass/filestore):
`Filestore`: If a rule matches then the file defined in the flow will be processed by Sigflow and stored like any other package.And this even if there is no rule for file generation by filemagic/extension.
`Bypass`: If a rule contains a 'bypass', the flow defined by that rule will not be analyzed regardless of its content.
`None`: no transformation is carried out.
`Category Default`: the rule applies the change defined at the category level and inherits this configuration.
`Ruleset`: the category applies the change defined at the ruleset level and inherits this configuration.`Reject`and`Drop`: As a reminder, the GCap is in IDS mode and not IPS i.e:
in IPS (Prevention) mode, the network flow passes through the detection system which can let it pass but also reject it (action
`Reject`) or delete it (action`Drop`)in IDS (Detection) mode, the network flow is copied by the TAP to the GCap so none of the actions
`Reject`or`Drop`make sense since the GCap does not have any action on the main flow.
Note
The default action in the solution is alert. As GCap is an IDS, not an IPS, normally there is no need to change this value.
- The
`Lateral`field enables the scope of the rule to be changed at the network variable level.If a rule has a source $HOME_NET and a destination $EXTERNAL_NET and both sides of the traffic being analysed are in $HOME_NET, then the rule will not raise an alert and lateral movements will no longer be detected.Thus, the transformation enables the value of the variable to be changed from "$EXTERNAL_NET" to "any" in order to broaden the scope to detect lateral movements.Here are the possible values:
`Auto`: substitution is made if the signature checks certain properties
`None`: the replacement is not performed
`Yes`: $EXTERNAL_NET is replaced by any other IP (any)
`Category Default`: the rule applies the change defined at the category level and inherits this configuration
`Ruleset Default`: the category applies the change defined at the ruleset level and inherits this configuration
- The field
`Target`adds the field "target:[src_ip dest_ip]" in the rule.It generates additional metadata indicating who is the target of the attack.Possible values are:
`Auto`: an algorithm is used to determine the target if one is present
`Destination`: the target is the receiving IP
`None`: the replacement is not performed
`Ruleset Default`: the category applies the change defined at the ruleset level and inherits this configuration.
`Source`: the target is the originating IP
7.3.3.1.2. Threshold rule
`Threshold rules` enable limiting the number of alerts for a given rule.`Limit`: enables a rule to sound an alert only a defined number of times. If the value is N, the alert will be raised N times and then not raised again within the chosen time interval.`Threshold`: Enables a rule to sound only after a defined number of alerts. If the value is N, the alert will be raised after N alerts within the chosen time interval.`Both`: Enables combining the`threshold`and`limit`types. It applies both thresholding and limiting.
Note
The rules created are available in the ruleset view page at the top right.
Example:
In the view below, the same value is defined as limit and threshold.

`Threshold` zone (2), the threshold counter is set to four. So for the period considered (here 60 seconds), an alarm (1) is activated every 4 attacks.`Limit` zone (3), the limit counter is set to four. So for the period considered (here 60 seconds), an alarm is activated only for the first 4 attacks.`Both` field (4), the counter is set to four. So for the period considered (here 60 seconds), an alarm is activated only for the first 4 attacks (limit value reached).7.3.3.1.3. Suppress rule
A rule raises 10 alerts every hour from the same IP source.It turns out that this is a false positive and that these alerts are irrelevant.In this case, it is appropriate to disable the rule for the IP source in question.The rule remains active on the rest of the network.
Note
The rules created are available in the ruleset view page at the top right.
For |
go to |
|---|---|
Transform rule |
|
Disabling a rule |
|
Enabling a rule |
|
Threshold rule |
|
Suppress rule |
This configuration interface is described in `Config - sigflow/rulesets` screen of the legacy web UI.
7.3.3.2. Prerequisites
User : member of Operator group
7.3.3.3. Preliminary operations
Login to GCenter via a browser (see Connection to the GCenter web interface via a web browser)
7.3.3.4. Procedure to setup a transformation rule
From the navigation bar, click successively on :
The
`Config`button`Rulesets`button of the`Sigflow`menu.The`Rulesets`window is displayed.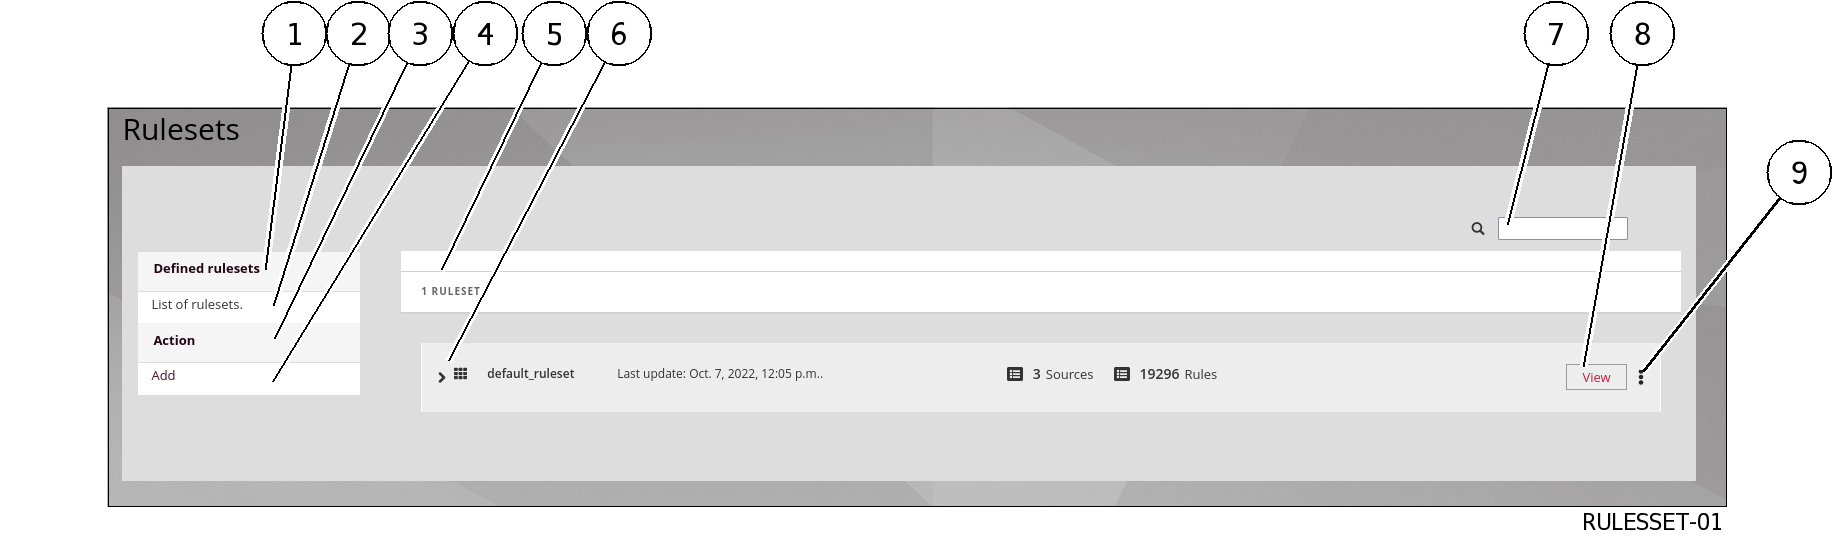
From the ruleset management interface:
Look for the SID of the rule to be modified in the top right-hand bar (7)
Click on the SID of the rule among the search results
Click on the
`Edit rule`link to display the edit menusMake sure to be in the
`Transform rule`menuTick the rule(s) in which the rule transformation is to be applied
Change the
`Action`,`Lateral`, and`Target`fields as requiredIf necessary, add a comment (optional)
Click on the
`Valid`button.
7.3.3.5. Procedure to disable a rule
From the navigation bar, click successively on :
The
`Config`button`Rulesets`button of the`Sigflow`menu.The`Rulesets`window is displayed.
From the ruleset management interface:
method 1 :
Look for the SID of the rule to be disabled in the top right-hand bar (7)
Click on the SID of the rule among the search results
Click on the
`Disable rule`linkTick the rule(s) in which the rule should be disabled
If necessary, add a comment (optional)
Click on the
`Disable`button
Or
method 2 :
Look for the SID of the rule to be disabled in the top right-hand bar (7)
Click on the SID of the rule among the search results
Click on the
`Edit rule`link to display the edit menusClick on the
`Disable rule`linkTick the ruleset(s) in which the rule should be disabled
If necessary, add a comment (optional)
Click on the
`Disable`button
7.3.3.6. Procedure to enable a rule
From the navigation bar, click successively on :
The
`Config`button`Rulesets`button of the`Sigflow`menu.The`Rulesets`window is displayed.
From the ruleset management interface:
method 1 :
Look for the SID of the rule to be enabled in the top right-hand bar (7)
Click on the SID of the rule among the search results
Click on the
`Enable rule`linkTick the ruleset(s) in which the rule should be enabled
If necessary, add a comment (optional)
Click on the
`Enable`button
Or
method 2 :
Look for the SID of the rule to be enabled in the top right-hand bar (7)
Click on the SID of the rule among the search results
Click on the
`Edit rule`link to display the edit menusClick on the
`Enable rule`linkTick the ruleset(s) in which the rule should be enabled
If necessary, add a comment (optional)
Click on the
`Enable`button
7.3.3.7. Procedure to setup a threshold rule
From the navigation bar, click successively on :
The
`Config`button`Rulesets`button of the`Sigflow`menu.The`Rulesets`window is displayed.
From the ruleset management interface:
Look for the SID of the rule to be modified in the top right-hand bar (7)
Click on the SID of the rule among the search results
Click on the
`Edit rule`link to display the edit menusClick on the
`Threshold rule`linkSelect the type of threshold desired
`threshold`,`limit`, or`both`Select whether the threshold should apply to the source or the destination
Enter the desired threshold value. The impact will be different depending on the type of threshold chosen
Enter the value of the desired time interval in which the threshold will apply
Tick the ruleset(s) in which the rule threshold is to be applied
If necessary, add a comment (optional)
Click on the
`Valid`button
7.3.3.8. Procedure to setup a suppress rule
From the navigation bar, click successively on :
The
`Config`button`Rulesets`button of the`Sigflow`menu.The`Rulesets`window is displayed.
From the ruleset management interface:
Look for the SID of the rule to be modified in the top right-hand bar (7)
Click on the SID of the rule among the search results
Click on the
`Edit rule`link to display the edit menusClick on the
`Suppress rule`linkSelect the type of threshold desired
`threshold`,`limit`, or`both`Select whether the threshold should apply to the source or the destination
Enter the IP address or network on which the rule will be disabled
Tick the ruleset(s) in which the deletion rule is to be applied
If necessary, add a comment (optional)
Click on the
`Valid`button