5.6.33. `Admin-GCenter-Configuration` screen of the legacy web UI
`Configuration` command from the `Admin-GCenter` menu, the following screen is displayed.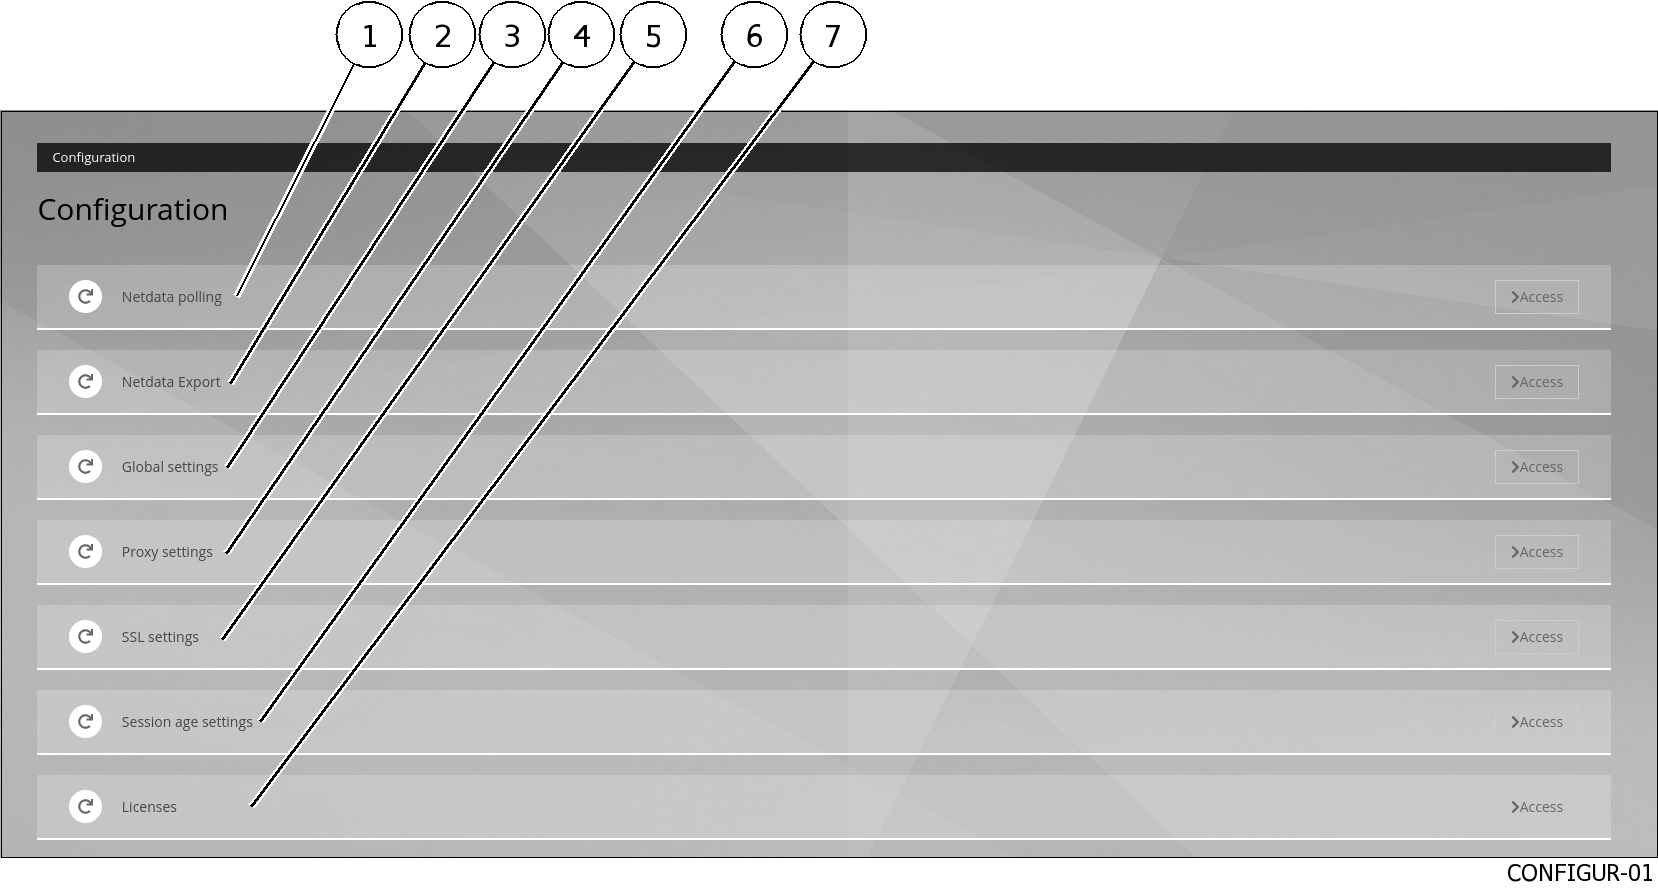
Item |
Name |
Function |
|---|---|---|
1 |
Configuration to have a Nagios-type supervision server retrieve the information |
|
2 |
Configuration of data export to an external Netdata server |
|
3 |
General GCenter configuration |
|
4 |
Configuration of the proxy server to retrieve updates via that server |
|
5 |
Configuring the GCenter SSL (Secure Socket Layer) certificate |
|
6 |
Configuration of the maximum total duration of a session on the GCenter web interface |
|
7 |
Viewing information about the current licence, checking its validity, and the available features |
5.6.33.1. `Netdata polling` section
`Netdata polling` button of the `Configuration` screen, the following screen is displayed.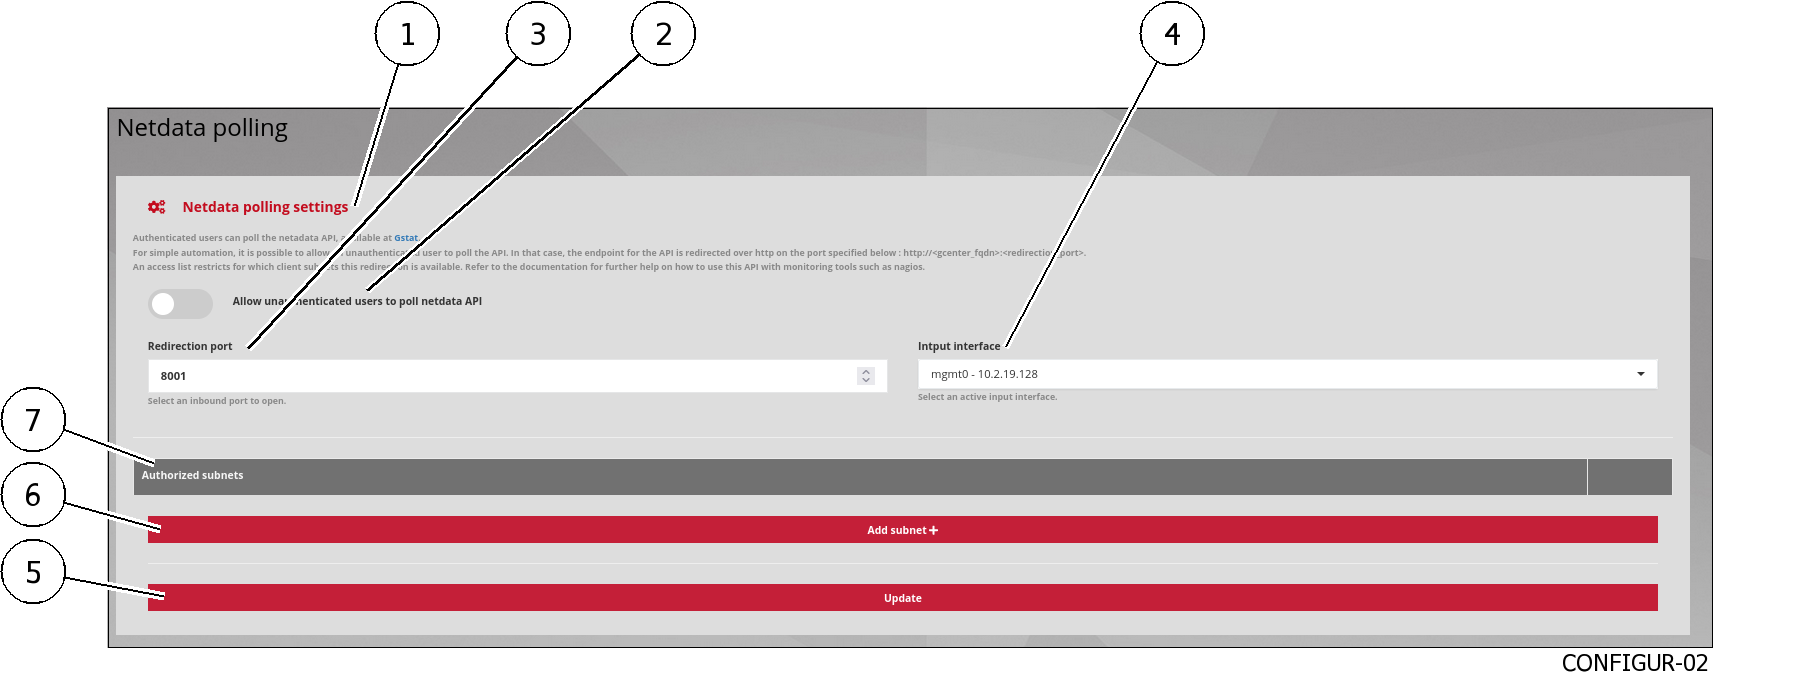
The `Netdata polling` section contains the following elements enabling data access to be configured for a Nagios-like monitoring server. This reads the information on the input interface.
Item |
Name |
Function |
|---|---|---|
1 |
`Netdata polling settings` areaThis area includes the following elements
|
Parameter definition area for metrics recovery via Netdata
|
2 |
|
Enabled |
3 |
|
Redirection port selector |
4 |
|
GCenter input interface selector |
7 |
`Authorized subnets` areaThis area includes the following elements
|
Displays authorized IP addresses
On the right side, two buttons enable modifying the IP addresses and their possible deletion
|
5 |
|
Backup and validation of current parameters
If everything is ok then the message
`The netdata polling configuration was successfully updated` is displayed |
6 |
|
Displays the IP address entry window for authorized subnets |
5.6.33.2. `Netdata Export` section
`Netdata Export` button of the `Configuration` screen, the following screen is displayed.The `Netdata Export` section contains the following items:
Item |
Function |
|---|---|
1 |
|
2 |
|
The `GENERAL` area contains the following items:
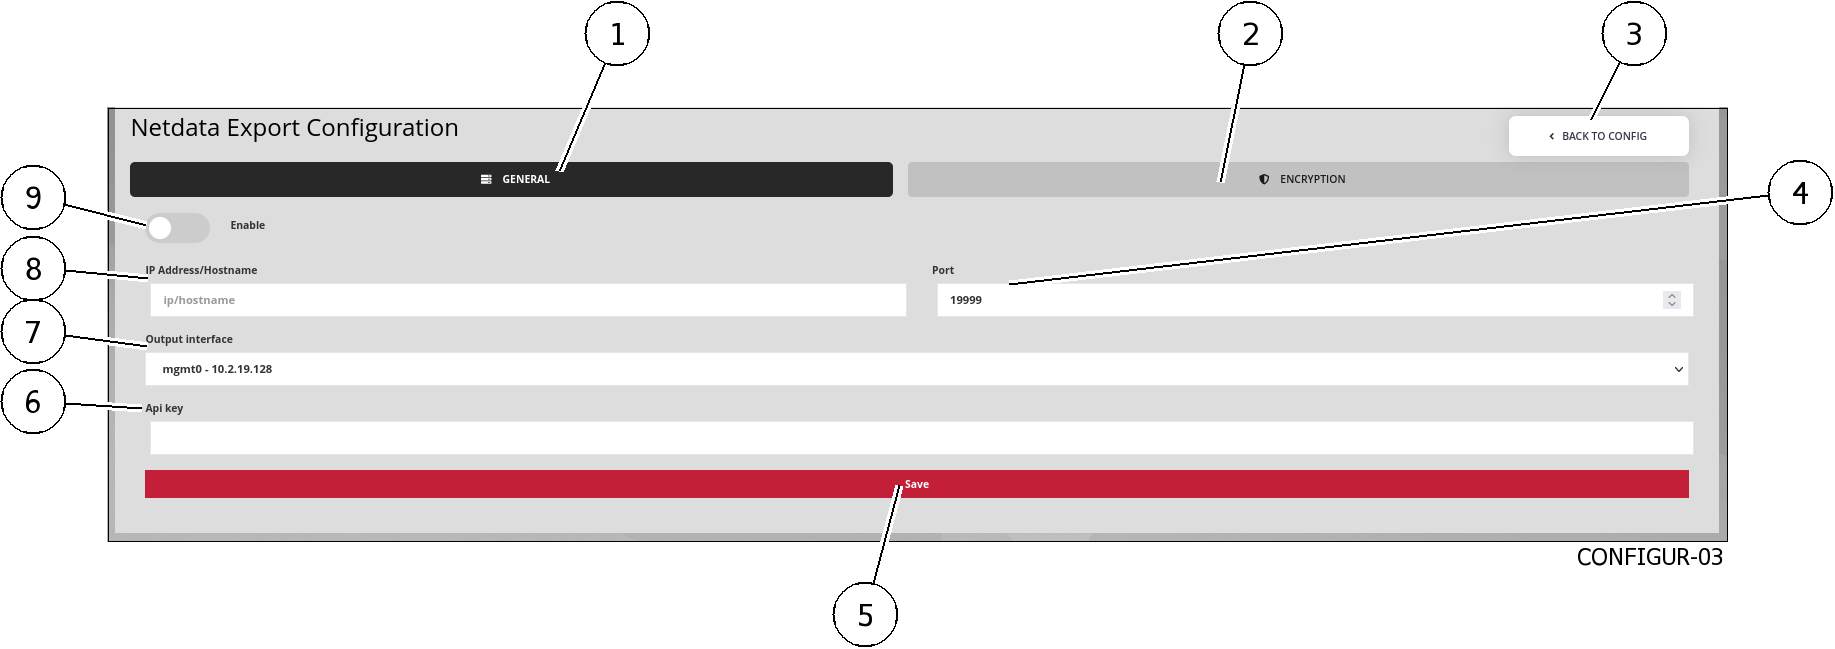
Item |
Function |
|---|---|
3 |
|
4 |
Input field |
5 |
|
6 |
|
7 |
|
8 |
|
9 |
|
`ENCRYPTION` field contains the following items for the Netdata part - Encryption:
Item |
Function |
|---|---|
1 |
|
2 |
|
3 |
|
4 |
|
5.6.33.3. `Global settings` section
After pressing the `Global settings` button of the `Configuration` screen, the following screen is displayed.
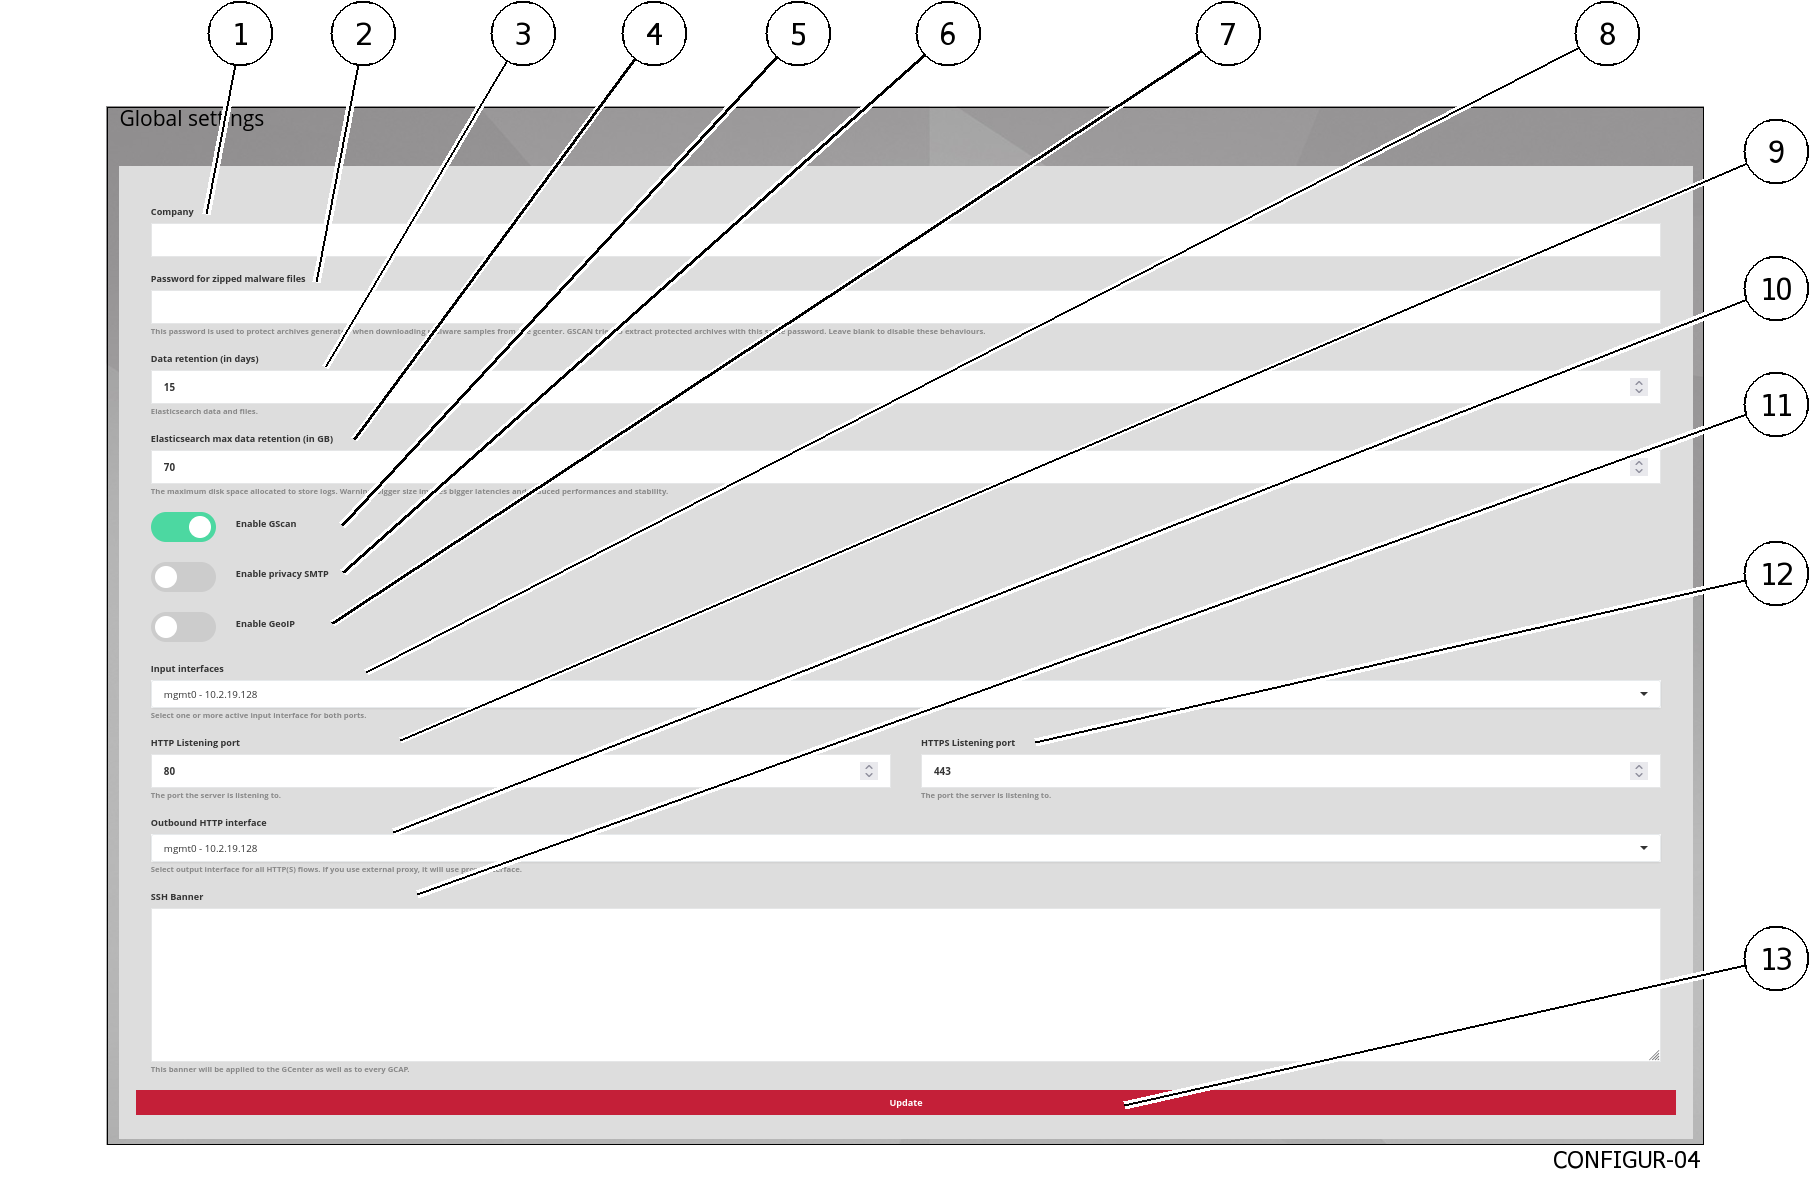
The `Global settings` section contains the following items:
Item |
Name |
Function |
|---|---|---|
1 |
|
Adds the company name to be added to the detection analysis reports.
These reports can be downloaded after making an association between the GCenter and the Intelligence site (or the GBox)
|
2 |
|
Defines the password protecting the archive when downloading malware and unzipping it to avoid an unintentional click.
This password will be the same for downloading shellcodes.
The specifics of this functionality are described in more detail in the Malcore sections
|
3 |
|
Defines the number of days the data is stored on disk.
Note that the configuration is applied in two steps: the first on the GCenter in this field,
The second at the level of the GCAP detection probe in the configuration parameters.
|
4 |
|
Sets the maximum disk space allocated for storing logs
Please note that a larger size implies higher latency, reduced performance and stability.
|
5 |
|
Enables real-time local scanning for malware or suspicious executables.
As part of the Military Programming Law, the GScan Function is disabled by default in this management interface.
|
6 |
|
Ensures that privacy rights are respected by hiding the email.subject field of SMTP alerts in the GATEWATCHER dashboards for private emails.
An email is considered personal if the subject line begins with the words private, personal or confidential (not case sensitive).
|
7 |
|
Depreciated function |
8 |
|
Enables/disables the interfaces on which the GCenter will listen on the following ports |
9 |
|
Listening port related to the http protocol. |
10 |
|
Defines the physical outbound interface for all http flows. |
11 |
|
Sets the SSH banner presented during pre-authentication on all paired GCaps as well as the GCenter. |
12 |
|
Defines the listening port related to the http protocol. |
13 |
|
stores the current settings |
For implementation, refer to GCenter Global Configuration.
5.6.33.4. `Proxy settings` section
The AIONIQ solution includes the possibility of configuring a proxy server (or proxy) to communicate with:
The MISP server
The GBox
Gatewatcher update servers (via GUM)
Note
After pressing the `Proxy settings` button of the `Configuration` screen, the following screen is displayed.
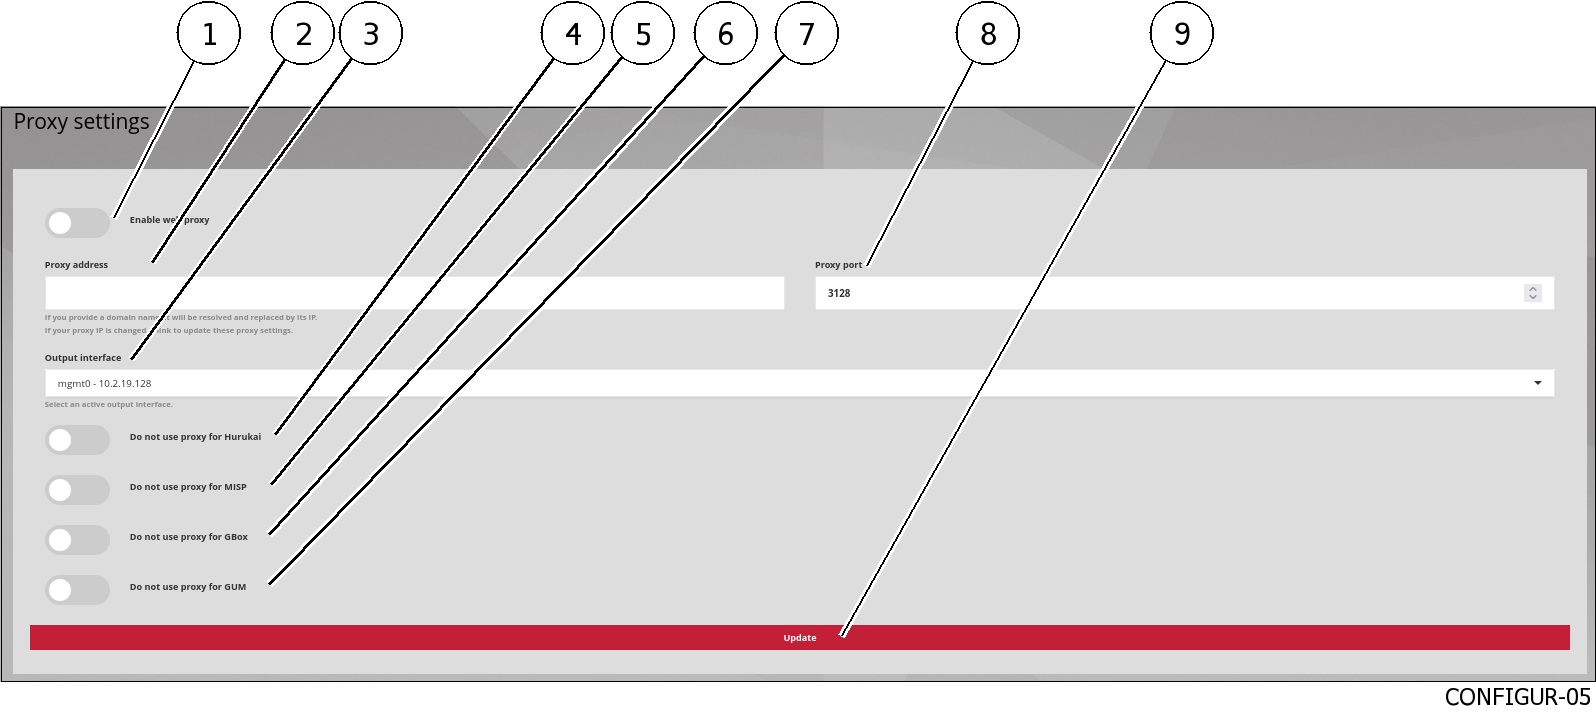
The `Proxy settings` section contains the following items:
Item |
Name |
Function |
|---|---|---|
1 |
|
Enables/Disables the use of the proxy |
2 |
|
Sets the proxy server address as an IP address or FQDN |
3 |
|
Selection of the GCenter network interface to be used to connect to the proxy |
4 |
|
Depreciated function |
5 |
|
Disables the proxy for interconnecting with the MISP server |
6 |
|
Disables the proxy for interconnecting with the GBox |
7 |
|
Disables the proxy for accessing GUM |
8 |
|
Selection of the proxy listening port (1-65535) |
9 |
|
Stores the current settings |
5.6.33.5. `SSL settings` section
After pressing the `SSL settings` button of the `Configuration` screen, the following screen is displayed:
5.6.33.5.1. `Security details` area
The `Security details` area enables obtaining information on the certificate currently in use.
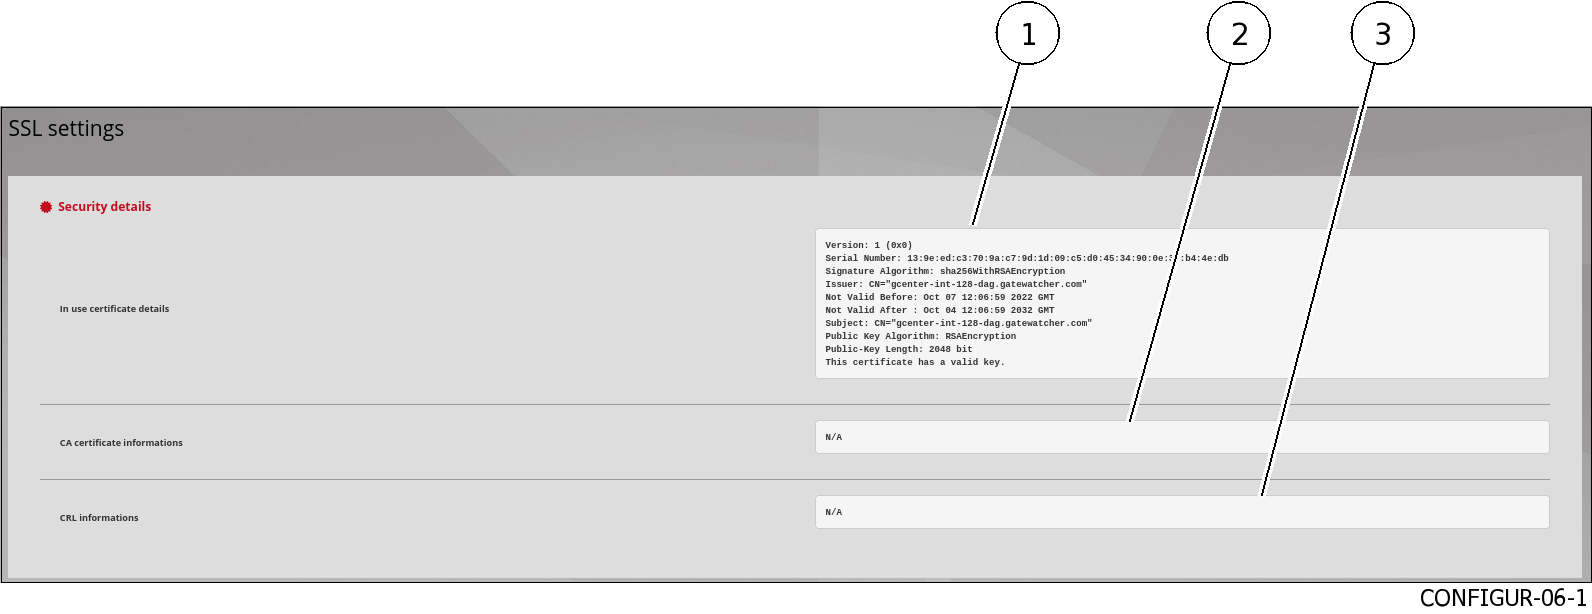
This area includes the following items:
Item |
Name |
Function |
|---|---|---|
1 |
|
Displays certificate information such as the date of issue and expiry, and the issuer of the certificate, etc. |
2 |
|
Displays the certificate authority information enabling the identity of the correspondents to be determined in the |
3 |
|
Lists identifiers that were revoked, invalidated, or are no longer trustworthy. |
5.6.33.5.2. `Custom Certificate` area
`Custom Certificate` area enables using a specific certificate.`GCenter Key` field and the PEM format certificate in the `GCENTER certificate` field and also by activating the `Enable Custom Certificate` selector.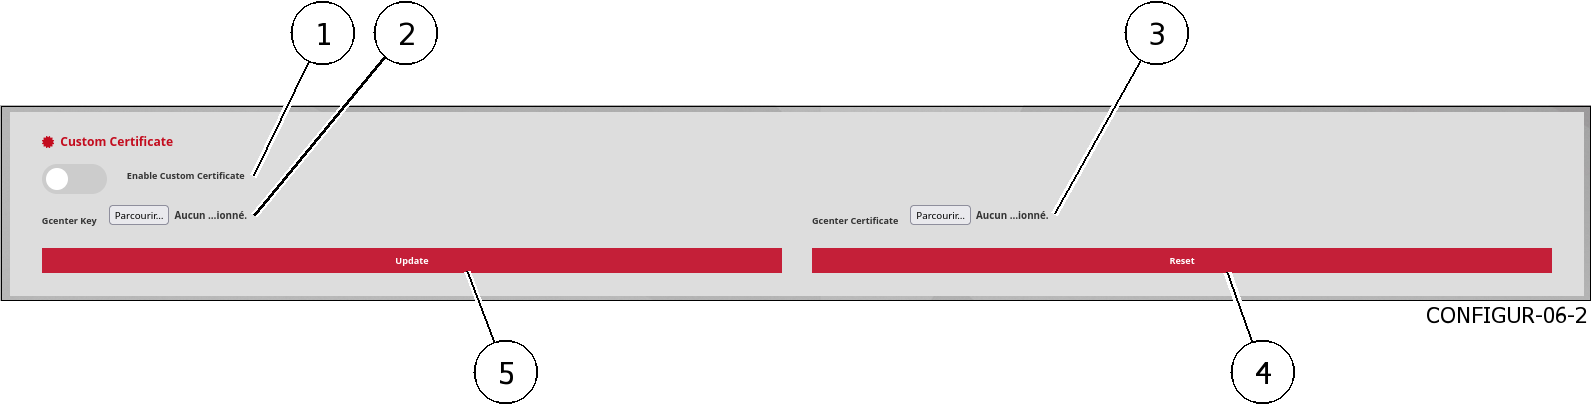
The `Custom Certificate` area contains the following items:
Item |
Name |
Function |
|---|---|---|
1 |
|
Enabling a personalized certificate |
2 |
|
Selection of a GCenter key file |
3 |
|
Selection of a GCenter certificate file |
4 |
|
Reinitalization of the configuration |
5 |
|
Stores the current settings |
5.6.33.5.3. `Dual authentication` area
`Dual Authentication` area enables mutual authentication (mTLS).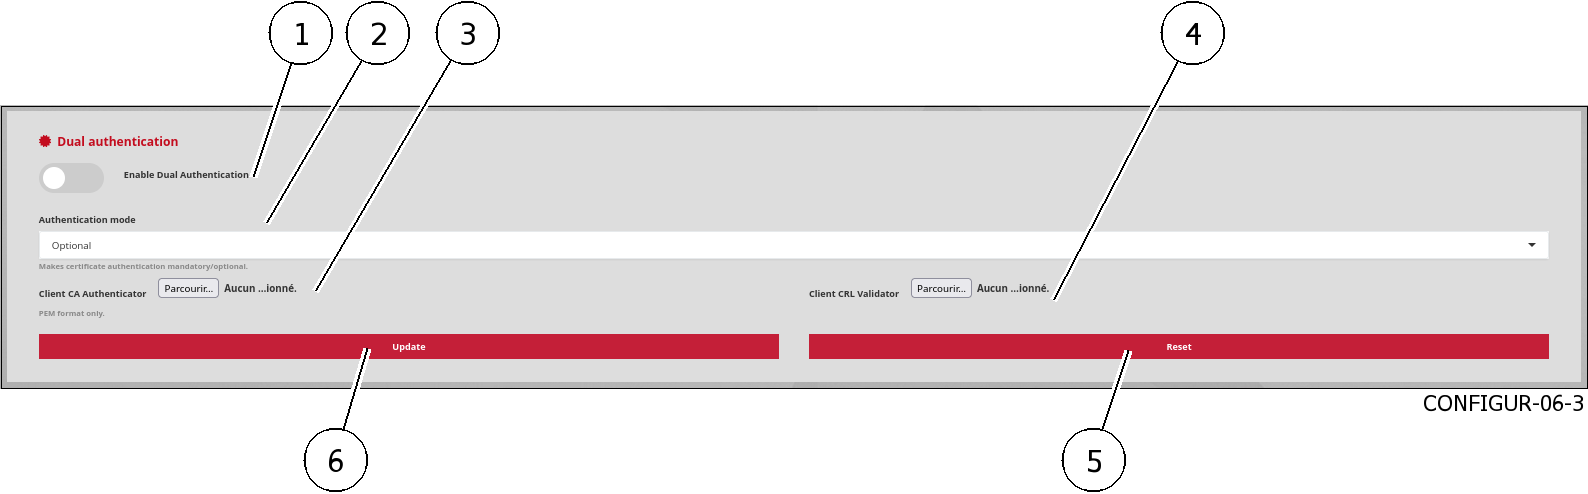
The `Dual authentication` area contains the following items:
Item |
Name |
Function |
|---|---|---|
1 |
|
Enabling a personalized certificate |
2 |
|
Selecting the type of authentication:
|
3 |
|
Selection of a certificate file issued by the certification authority in PEM format |
4 |
|
Selecting a file from the list of revoked certificates |
5 |
|
Stores the current settings |
5.6.33.6. `Session age settings` section
`Sessions age settings` button of the `Configuration` screen, the following screen is displayed.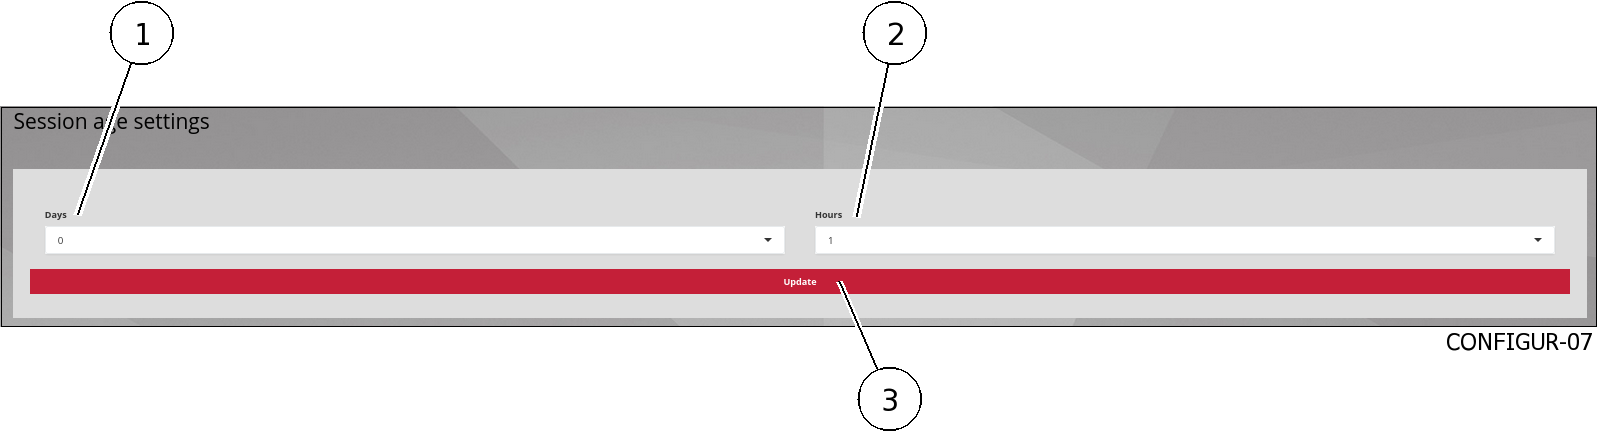
The `Session age settings` section contains the following items:
Item |
Name |
Function |
|---|---|---|
1 |
|
Duration of the session in days |
2 |
|
Duration of the session in hours |
3 |
|
Stores the current settings |
5.6.33.7. `License information` section
`Licenses` button of the `Configuration` screen, the screen `License information` is displayed.`License information` screen is used to obtain information about the current license, verify its validity and available features.`License details` area enables obtaining information on:The material for which this licence was issued via its model and serial number
The period of validity of the licence
The associated contact address
The type of licence
Note
To obtain a GCenter license, please contact GATEWATCHER business engineers or contact them at trade@GATEWATCHER.com.
5.6.33.7.1. `License details` area

The `License details` area contains the following items:
Item |
Field |
Function |
|---|---|---|
1 |
|
Server information |
2 |
|
Name of the licence |
3 |
|
Registration of the licence |
4 |
|
Email of the licence owner |
5 |
|
Licence registration date and remaining duration |
6 |
|
GCenter material type (e.g. virtual) |
5.6.33.7.2. `License features` area
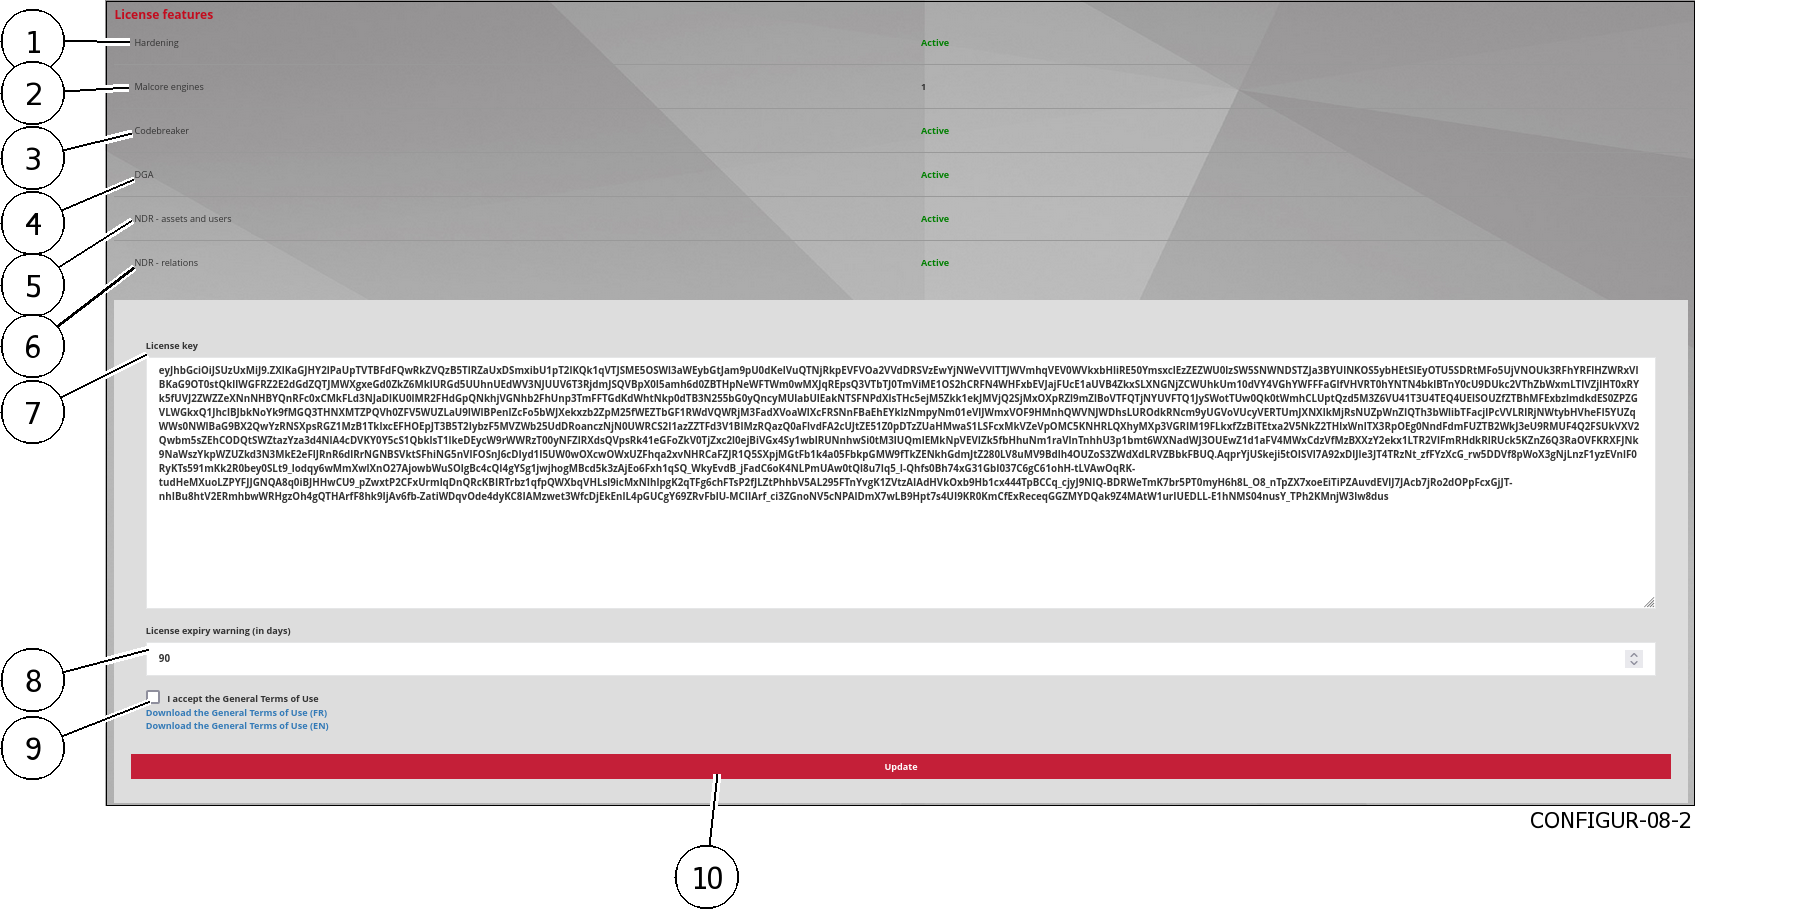
The `License features` area contains the following items:
Item |
Name |
Function |
|---|---|---|
1 |
|
Server information |
2 |
|
Number of Malcore engines |
3 |
|
Information on enabling the Malcore engine |
4 |
|
Information on enabling the DGA engine |
5 |
|
Information on NDR user functions and equipment |
6 |
|
Information on NDR relations functions |
7 |
|
Entering the licence key |
8 |
|
Entering the number of days of the licence expiration alarm message |
9 |
|
Selecting acceptance of the terms of use |
10 |
|
Stores the current settings |