1. Presentation of the equipment
1.1. GCenter
GCENTER is the centralised management equipment of the TRACKWATCH solution. It enables receiving and analysing alerts from the GCAP probes and configuring the TRACKWATCH solution in an intuitive way.
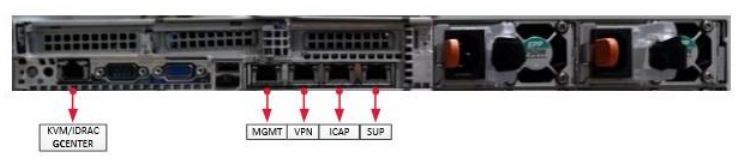
CGCENTER thus has five interfaces performing the following roles:
KVM/IDRAC: Remote administration interface
SUP0: Interaction with Nagios
ICAP0: Interaction with the Proxy
VPN0: Dedicated VPN interface with GCAP (optional)
MGMT0: Management interface
Note
Although the names of the interfaces may suggest that they are specifically dedicated, it is possible to use these interfaces for other purposes via the "output interfaces" options.
1.2. GCAP
The GCAP probes enable analysing the received flow in order to detect, capture, reconstruct, sort, and transmit files, malicious code, and events to GCENTER.
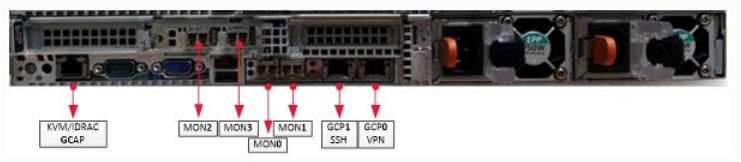
In addition to the three management interfaces, GCAP probes have a variable number of capture interfaces:
KVM/IDRAC: Remote administration interface
GCP0: VPN interface and optional management interface
GCP1: Dedicated management interface (optional)
mon0-monX: Capture interface
The use of the GCP1 interface to separate the management flow from the VPN's IPSec traffic may be mandatory for sensitive environments. Otherwise, it is possible to only use the GCP0 interface for management and VPN flows.
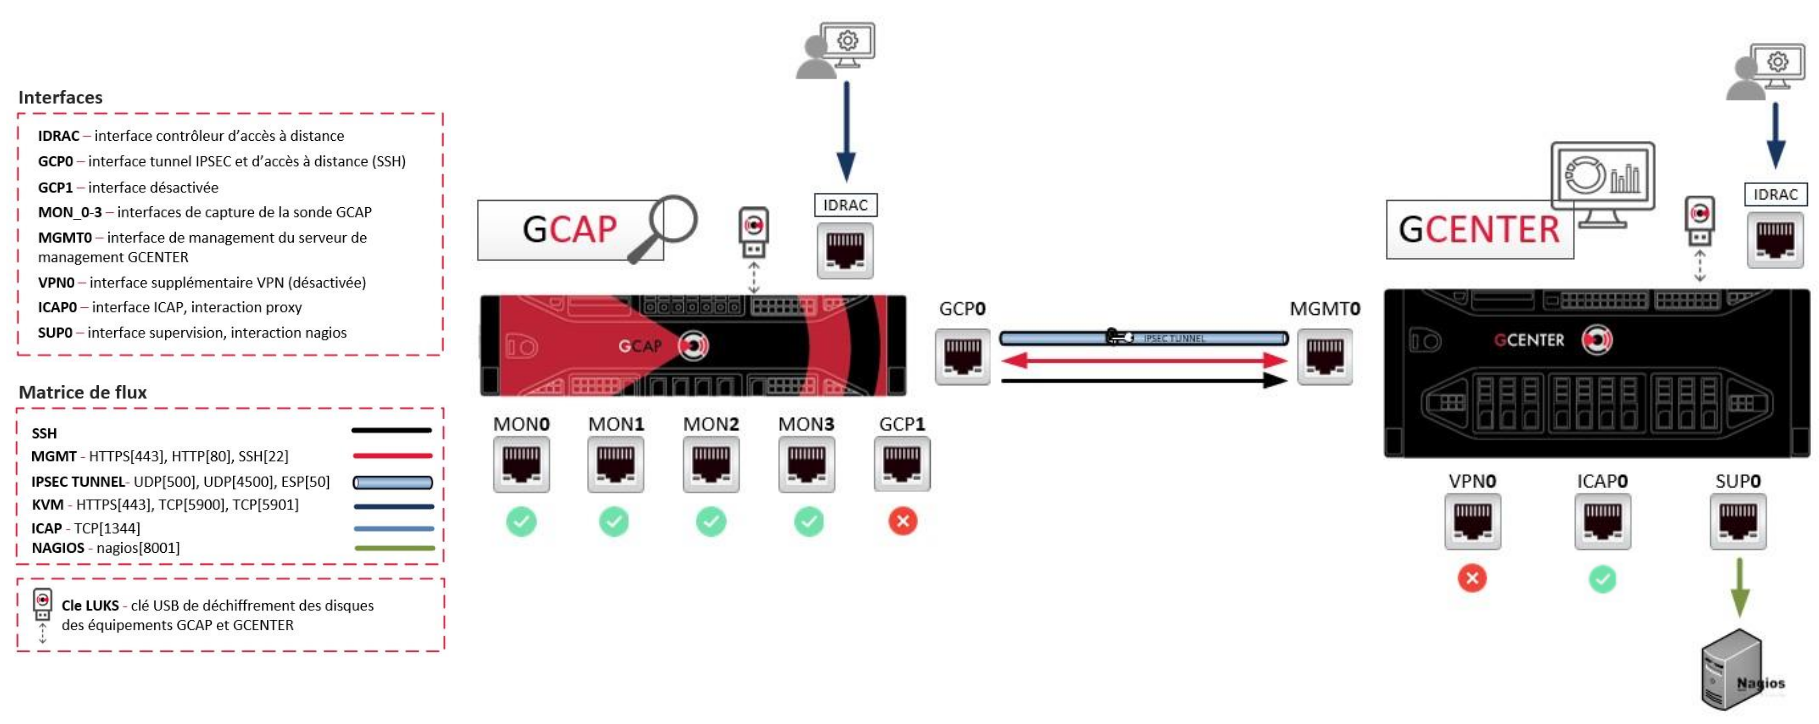
2. Flow Matrix
As previously explained, two communication modes are possible for communicating between the GCAP and the GCENTER.
The first mode, which is the mandatory mode in the case of a sensitive environment, is the following:
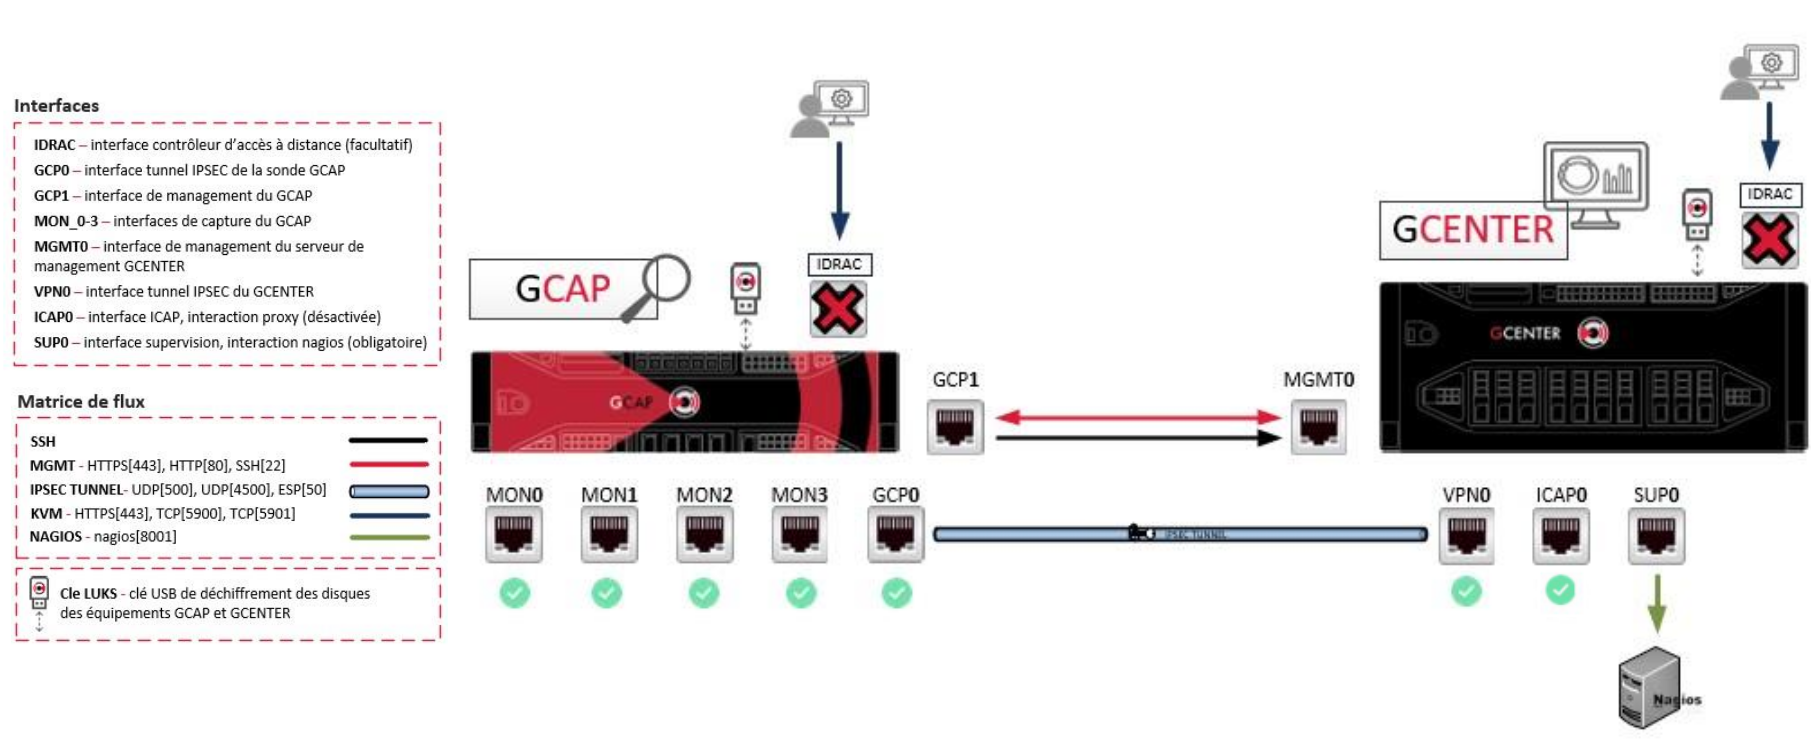
As for the second mode, it enables pooling an interface for transiting the management and VPN flows.
3. Example of architectures
Although implementing the TRACKWATCH solution is dependent on the architecture of the IS, here are three examples of typical implementations.
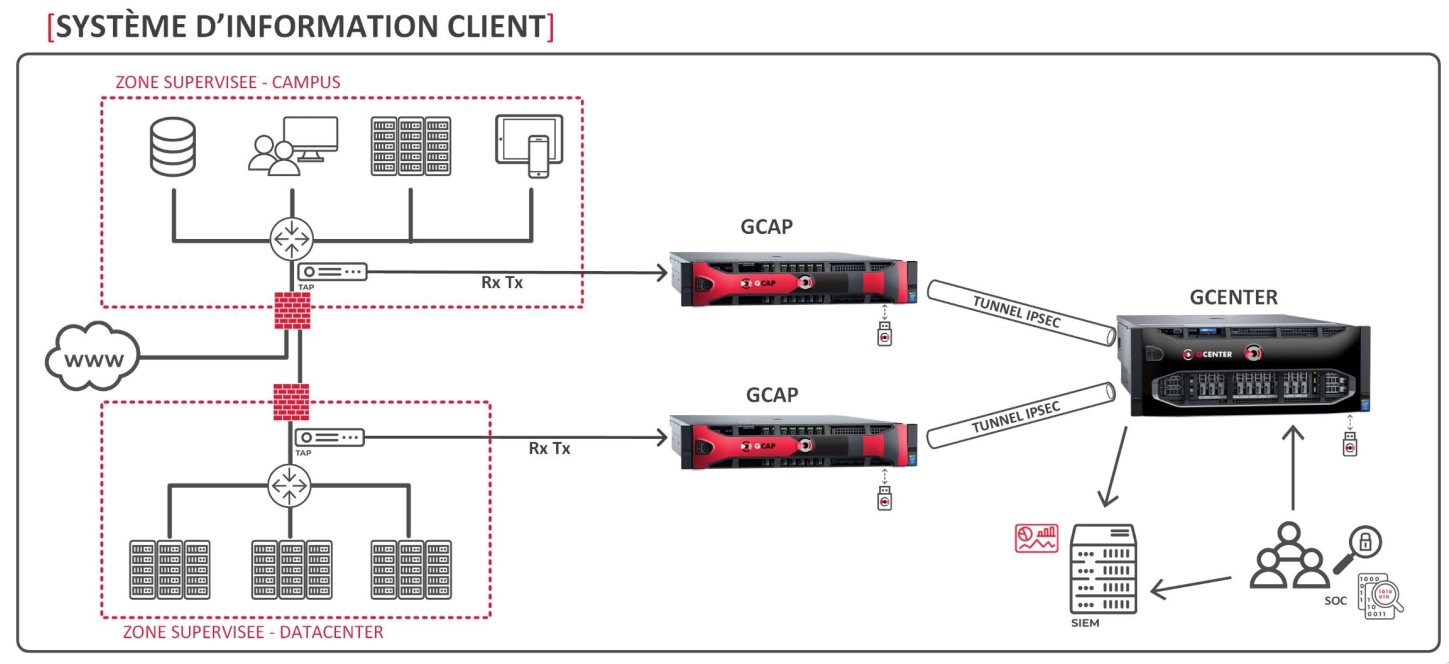
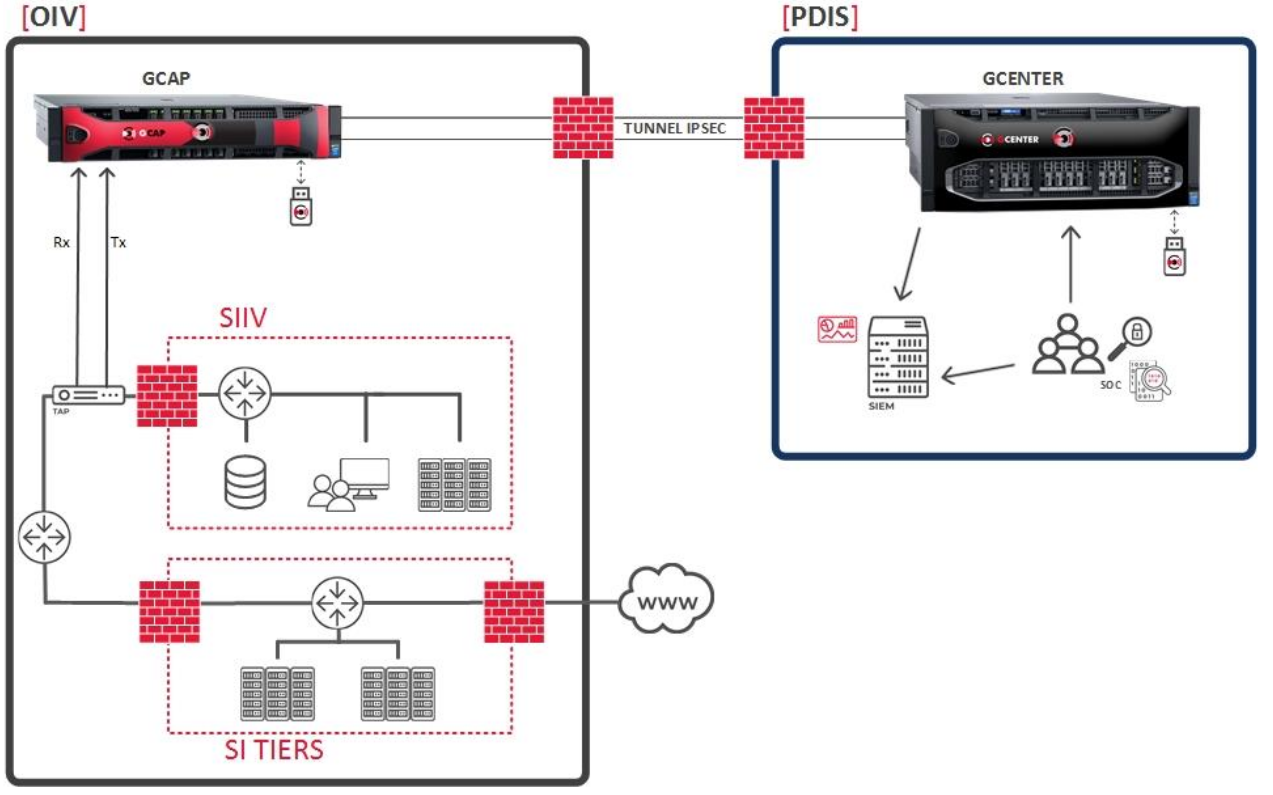
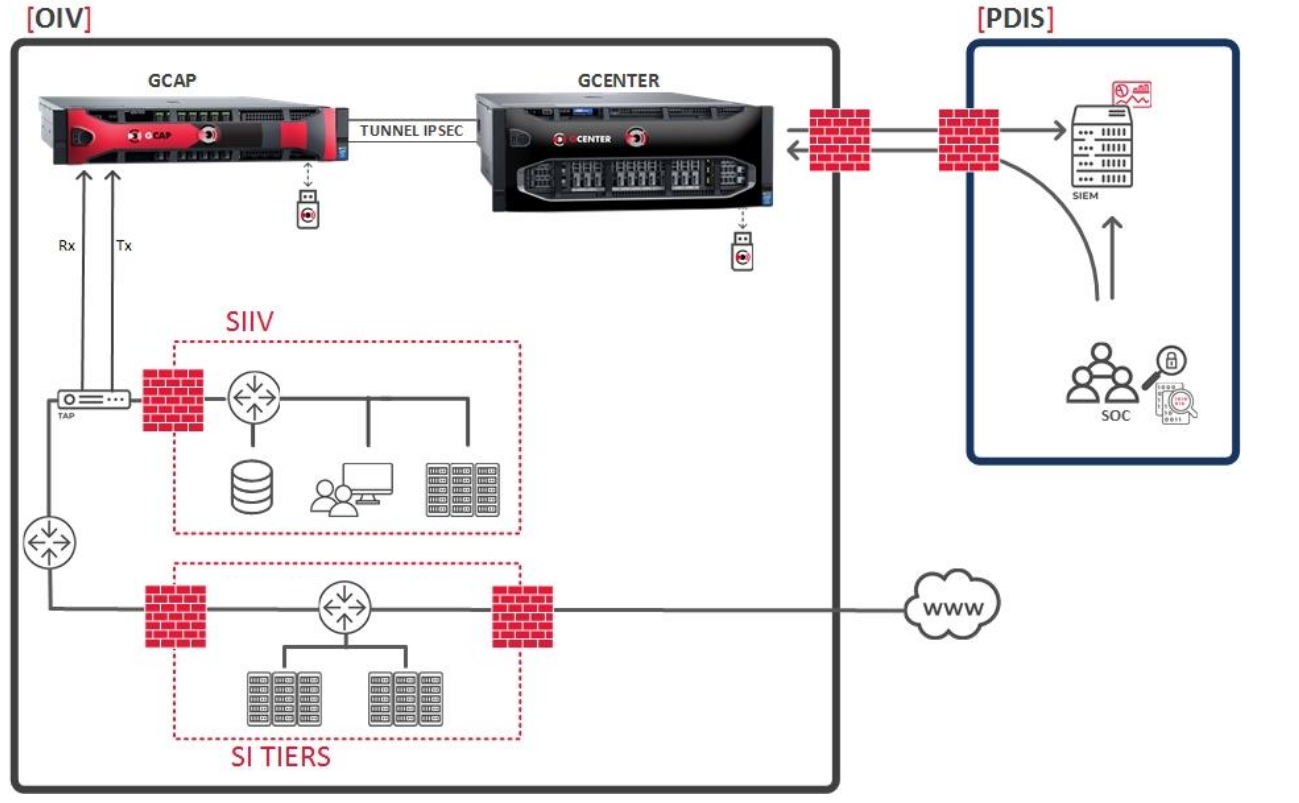
In the case of sensitive information systems, subject to the MPL for example, of the examples provided only the last two are possible.
4. Configuration
4.1. Initial configuration
Note
Installing and configuring the GCAP probes is covered in the GCAP documentation available at https://docs.gatewatcher.com/gcap.html.
Although much of the solution is already configured by the Gatewatcher teams, it will be necessary to complete, at a minimum, the network configuration of the GCenter in order to access the interface.
When connecting for the first time, it will be necessary to access the GCENTER via the iDRAC interface or a terminal in order to perform the network configuration.
The user to use is the setup user, by default the password for this user is: default.
Important
It is essential to change this password as soon as possible.
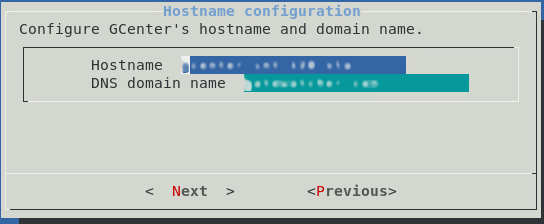
Once logged in, the configuration menu will appear:
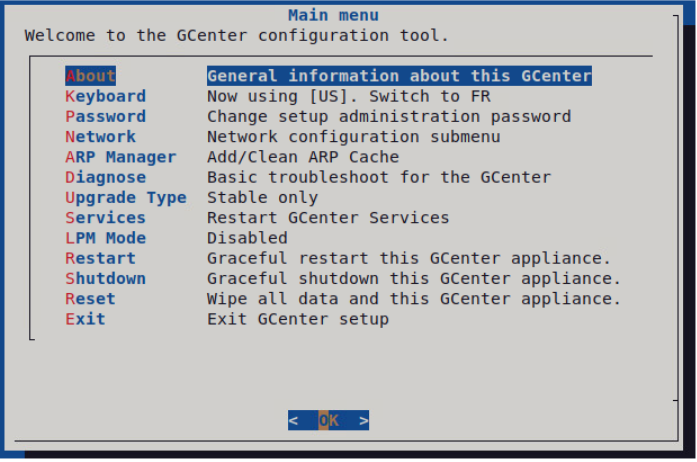
If necessary, select the Keyboard entry to enable an azerty configuration.
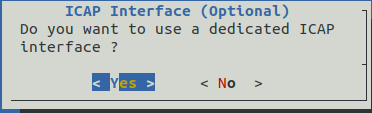
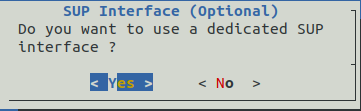
Then by selecting the Network entry, simply answer the various questions. Here is an example of the questions asked during the initial configuration.
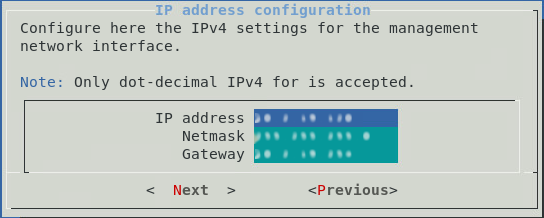

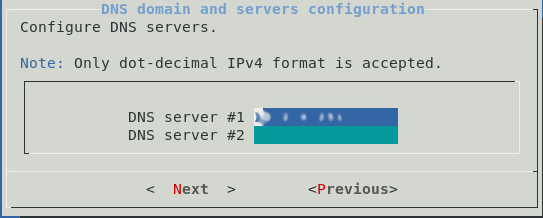
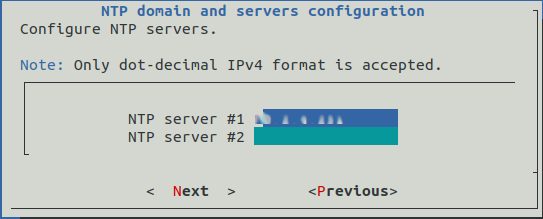


Once this initial configuration is complete, it is possible to connect to the GCENTER interface via a web browser in https at the configured address.
4.2. Global configuration

Once connected to the interface, in the menu on the left are two sections: Operators and Administrators corresponding to the actions that can be performed by the users of these groups.
The Gcenter - Configuration component of the ADMINISTRATORS section of the GCENTER is particularly important. It will enable major changes to be made to equipment, functions, interconnections, and even analysis results.
From this configuration interface, the administrator will be able to customise the parameters of the GCENTER management solution via these seven tabs:
4.2.1. Global Settings
Menu: Administrators > GCenter > Configuration > Global Settings
 Each of the menu's sub-options will be detailed for an improved understanding of the product. These options will enable you to refine your criteria as much as possible in order to optimise the general operation.
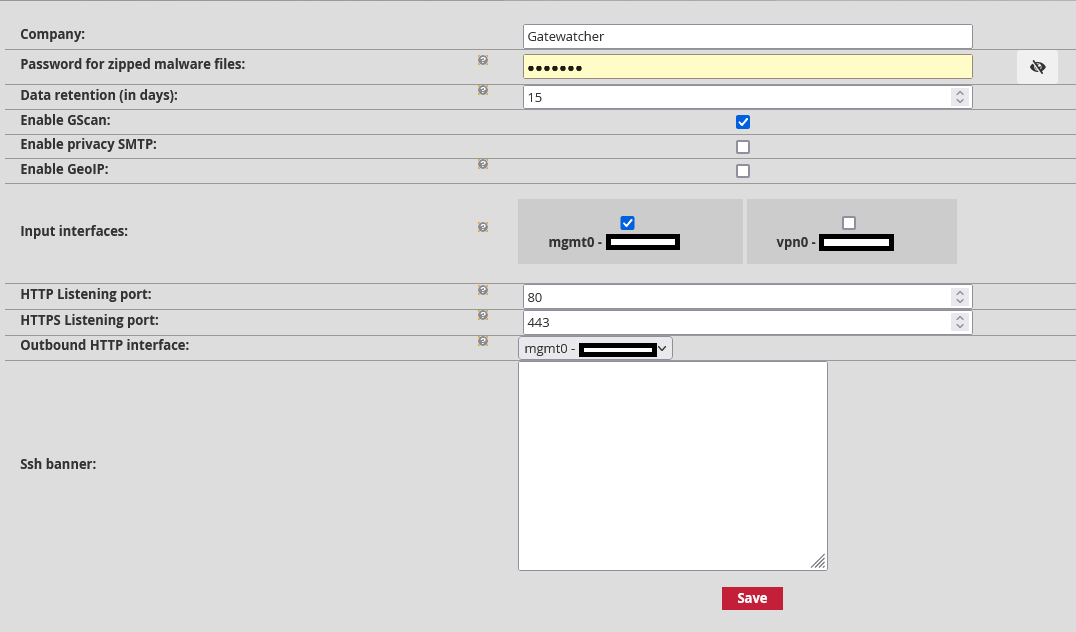
Company (default value: empty): This field enables the company name to be added to the detection analysis reports. These reports can be downloaded after making an association between the TRACKWATCH solution and the Intelligence platform.
Password for zipped malware files (default value: empty): enables you to change the password protecting the archive when downloading malware and unzipping it to avoid an unintentional click. This password will be the same for downloading shellcodes. The details of this Function are described in more depth in Malcore
Data retention (in days) (default value: 15): enables choosing the number of days that the TRACKWATCH solution files and index are retained on disk. Note that the configuration is applied in two steps. The first is on the GCENTER at this field. The second is on the GCAP detection probe in the configuration parameters.
GScan enable (default value: enabled): allows local real-time scanning for malware or suspicious executables. As part of the Military Programming Law, the GScan Function is disabled by default in this management interface.
Privacy SMTP enable (default value: disabled) ensures that privacy rights are respected by hiding the email.subject field of SMTP alerts in the GATEWATCHER dashboards for private emails. An email is considered personal if the subject line begins with the words private, personal or confidential (not case sensitive). This option is disabled by default.
GeoIP enable (default value: disabled): allows geolocation of source and destination IP in events. This option must be enabled for the SmartMap feature to run. The following fields will be added to events
| Field | example |
|---|---|
| (src|dest)_geoip.city_name | Tokyo |
| (src|dest)_geoip.continent_code | AS |
| (src|dest)_geoip.coordinates | 8, 16, 8, 16, 139.753, 35.688 |
| (src|dest)_geoip.country_code2 | JP |
| (src|dest)_geoip.country_code3 | JP |
| (src|dest)_geoip.country_name | Japan |
| (src|dest)_geoip.ip | 27.0.0.146 |
| (src|dest)_geoip.latitude | 35.688 |
| (src|dest)_geoip.location | { "lon": 139.7532, "lat": 35.6882 } |
| (src|dest)_geoip.longitude | 139.753 |
| (src|dest)_geoip.postal_code | 102-0082 |
| (src|dest)_geoip.region_code | 13 |
| (src|dest)_geoip.region_name | Tokyo |
| (src|dest)_geoip.timezone | Asia/Tokyo |
Input interface: enables/disables the interfaces on which the GCENTER will listed on the following ports.
HTTP listening port (default value: 80): the listening port related to the http protocol.
HTTPs listening port (default value: 80): the listening port related to the https protocol.
Outbound HTTP interface: The physical outbound interface for all http flows.
SSH banner (default value: empty): SSH banner presented during pre-authentication on all paired GCaps and the GCenter.
Once the modifications are completed, it will be necessary to record these changes by clicking on the Save button.
Important
If the GCENTER and GCAP equipment are in an environment that is part of the Military Planning Law (MPL) framework the GSCAN service is automatically disabled and cannot be activated. For more information, please refer to the MPL section of this document for GScan deactivation.
4.2.2. Proxy Settings
Menu: Administrators > GCenter > Configuration > Proxy Settings
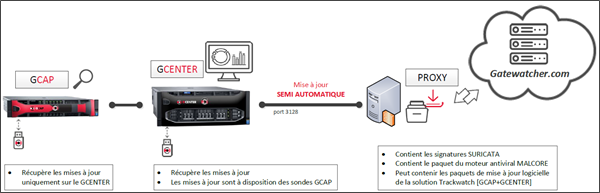
 The TRACKWATCH solution includes the possibility of configuring a proxy server (or proxy) in order to retrieve updates (signature updates) via the proxy.
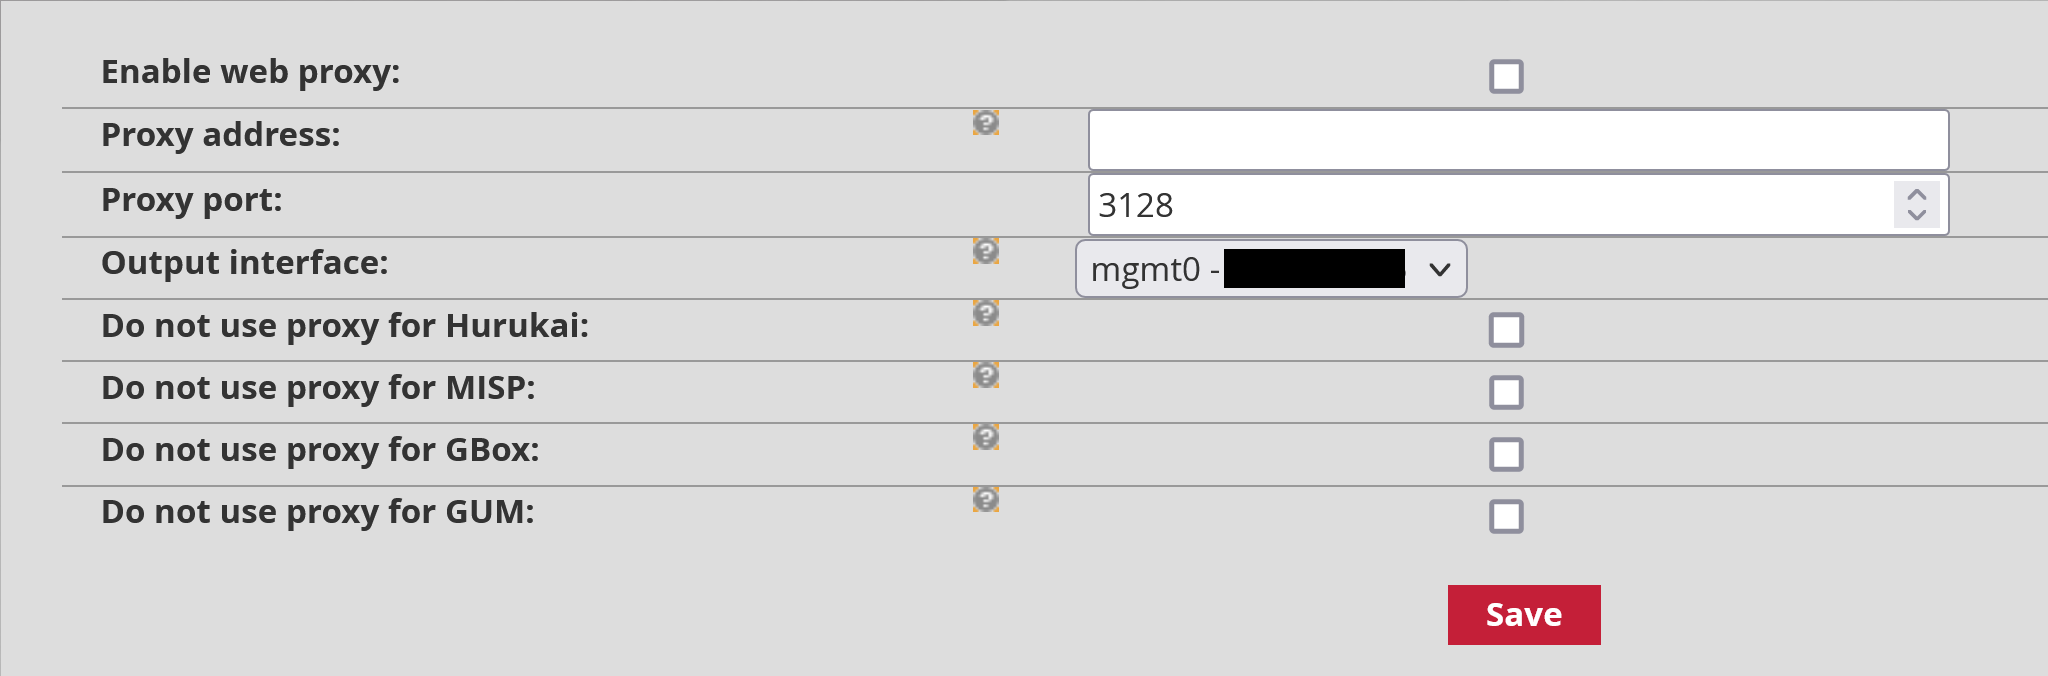
Enable Web Proxy: Enables/Disables the use of the proxy
Proxy address: Proxy address as IP address or fully qualified domain name (FQDN)
Proxy port: Proxy listening port (1-65535)
Output interface: the GCENTER interface to use to reach the proxy.
Do not use proxy for Hurukai/MISP/GBOX/GUM: Enables the administrator to decide whether to use the proxy settings for integration with [Hurukai](itg-ext. html#hurukai-by-harfanglab)/MISP or for access to a GBOX or GUM.
Once the modifications are completed, it will be necessary to record these changes by clicking on the Save button.
This update mode is part of the compliance with the Military Programming Law (MPL). As such, the entity concerned will make its updates on a dedicated update server. For more information, please refer to the annex concerning MPL related details of this document and the [update] section (update.html#update-signatures-update).
4.2.3. SSL Settings
Menu: Administrators > GCenter > Configuration > SSL Settings
 This interface enables configuring the Secure Socket Layer (SSL) certificate of the GCENTER. The generated certificate will attest to the GCENTER's identity and enable encrypting the exchanged data. From this page it is also possible to configure mutual authentication (mTLS).
The Security details section enables obtaining information on the certificate currently in use by the GCENTER.
In use certificate details: Displays certificate information such as the date of issue and expiry, and the issuer of the certificate, etc. CA certificate information: Displays the information the server holds regarding the certificate authority enabling the correspondents' identity to be determined in the Dual Authentication section.
CRL information: lists identifiers that were revoked, invalidated, or are no longer trustworthy.

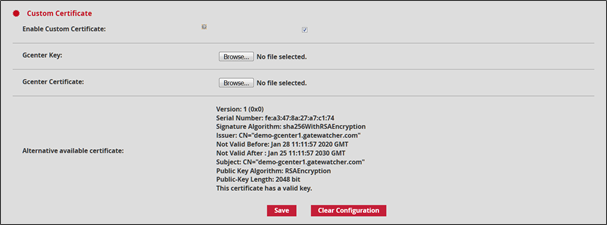
The Custom Certificate section enables using a specific certificate.
To do so, simply specify the private key in the GCenter Key field and the certificate in PEM format in the GCENTER certificate field and also activate this certificate by ticking the Enable Custom Certificate box.
Finally, the Dual Authentication section enables mutual authentication (mTLS). This allows the user to verify the identity of the server, as well as allowing the server to verify the identity of the user.
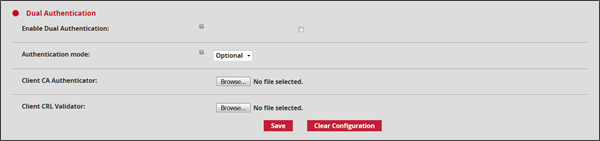
In order to validate this option, it is necessary to add the authority certificate issuing the user certificates in PEM format in the Client CA Authentication field, as well as the list of revoked certificates in the Client CRL Validation field. Then select the type of authentication Forced making it mandatory for users to enter a certificate issued by the certification authority, or Optional which only checks if a certificate is present, from 'Authentication mode' after enabling the Enable Dual Authentication option.
Once the modifications are completed, it will be necessary to record these changes by clicking on the Save button for each modified section.
4.2.4. Session age settings
Menu: Administrators > GCenter > Configuration > Session age settings
This section enables configuring the maximum total duration of a session on the GCenter web interface.
Simply enter the maximum duration of a session in the Days and Hours fields, then validate.

4.2.5. Licenses
Menu: Administrators > GCenter > Configuration > License
The License section enables obtaining information on the current license, and to check its validity and available functions.
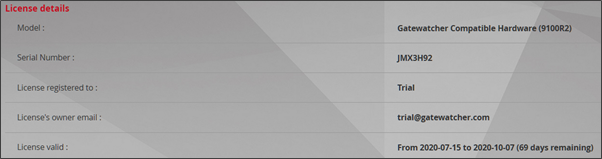
The Licence details section enables obtaining information on the material for which this licence was issued via its model and serial number, together with the period of validity of the licence, the associated contact address, and type of licence.
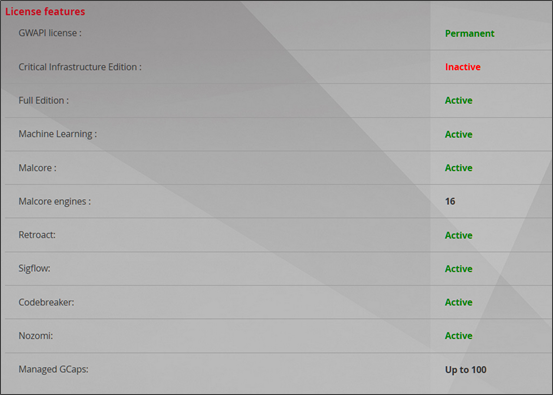
Then, in the Licence features section, it is possible to determine the availability of the various modules that will be explained in the rest of this documentation.
Finally, it is possible at the bottom of the page to enter a new licence, and also to set the notification in the interface of a near expiry date by entering the number of days before the expiration.
To obtain a GCENTER licence, please contact your GATEWATCHER business engineer or contact them at commerciaux@GATEWATCHER.com .
Once the license is validated and activated, the content of the page updates and displays the details of the license.
In the event of a missing or expired licence, the interface will automatically redirect to this page to resolve the issue.